 |
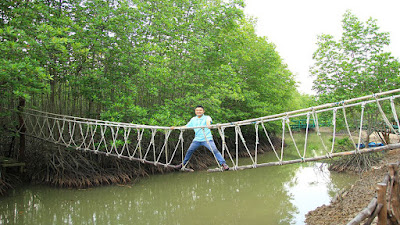
| Ambitious Monkey Bridge (not recommended for a first time out) |
If you're going to work with Pathfinders, you've got to know how to build a monkey bridge. You may think it's a useless skill, but I've built two or three of them over my career. One was over a deep gully at a treatment center for emotionally disturbed kids. It was part of our obstacle course. The kids helped me build it and keep it up. It expanded our nature trail significantly. They loved to cross the gully after a rain when there was water in the creek below.
It's a basic Pathfinder thing. Here's how to build one. It's easier to build one over the ground than over a creek or gully. Start out with a simple practice one before you try to build one over a gap. You can string the support ropes while standing on ground. Over a creek, you have to work your way across while standing on the ropes. It's a lot trickier. For detailed instructions, the Boy Scouts
Materials:
- 3 strands 5/8" to 3/4" rope - each the length of the span plus 1/3 to 1/2 the gap extra for tie-offs
- 3/8" to 1/2" support ropes
- 2 pair of 5/8" to 3/4" anchor ropes - 15 to 20' long
- 6 heavy 3 foot long steel spikes
- 50 feet of 1/4" lashing cord
- 3 pound sledge hammer or 20 pound sledge - your choice
- 6 - 8' landscape timbers for the sheer legs.
- 2 - 3' squares of thick fabric
- Measure the distance you need to span. Twenty-four feet is a good beginner's span with kids. Anything much longer can be dangerous, especially if the lashings aren't secure as they are likely to be with kids. Lay out the foot rope
- Set up two teams. One group starts out building the sheer legs (the big wooden A's in the picture). The other bunch should drive in the anchors.
- When putting together the sheer legs, put some kind of thick fabric between the legs to protect the foot rope from friction against the sheer legs.
- Drive 3 anchors about 2 feet apart and 8 feet or so from the sheer legs. Some experts drive the three in a line as shown in the drawing. Drive the stakes into the ground angled away from the sheer legs. Drive them deep. They'll have to take a lot of strain.
- Lash the sheer legs together as shown in the picture and raise them on both ends. To make them more secure dig holes for the legs to secure them.
- Tie anchor ropes to the outside stakes and tie them between the anchors and the tops of the sheer legs. Use a clove hitch with a keeper half hitch to keep them from slipping. You can also use a round turn and two half hitches to secure topes to the sheer legs.
- Run the foot rope between the legs of the sheer legs over the top of the fabric between the sheer legs. Tie the ends of the foot ropes to the center stakes at either end. I've used a stick or pole as a lever, taking one turn of the handle in the foot rope between the sheer legs and the anchor. Once the foot rope is in place, you can take half turns in the rope with your stick and then lash the end of the handle to keep the foot rope tight. The foot rope will take most of the weight so it needs to be tight. The top ropes will provide extra support.
- Next thing is to tie the handropes between the tops of the sheer legs so that you have two handrails that will be shoulder height above the foot rope. The bridgeway will be shaped like a "V". Again use a clove hitch which you can pull tight and secure and then tie an overhand knot as keeper
- Now begin tying the support ropes between the handrails and the foot rope. I use clove hitches and lengths of rope long enough to make four passes. Start tying the ropes from one end. If you run out of rope start a new length by overlapping the first knot. I use clove hitches because they make a nice longer knot to step on. The first time you can tie the support ropes standing on the ground. For fun try doing it as though you were working over a height. It's tricky, but challenging for the kids and that's what you want.
- When you're done, check all the knots, make adjustments as necessary, put away your tools and let the kids try it out.
 |
| Here's a simple X-frame version |
Notes:
You can find details on the knots and safety recommendations by following the links below. The Scouts have some really good material on building a monkey bridge. Once you've mastered it, you can hang one anywhere. At camp we once hung one over an inlet of the lake. If you fell, you made a big splash. How cool is that?
If you've never built one with your kids you owe it to yourself to do it.
Detailed References:
- Double-A-Frame-Monkey-Bridge
- Monkey Bridge - Boys Life Article
- Teach Your Scouts How to Build a Monkey Bridge
- Simple Pioneering - Build a Monkey Bridge
- Monkey Bridge - The Real Deal
- Building a 100' Monkey Bridge
- How to Build a Monkey Bridge - video


No comments:
Post a Comment